You need roughly 270mm of cellulose insulation over 100mm loft joists to meet current UK guidance for a pitched roof. That means about 170mm above the joist plus the existing 100mm depth, laid at the density stated on the bag. Do not compress it to fit.
On this page
- Quick recap
- Set the total depth at 270mm for 100mm loft joists
- Why the target keeps changing
- Layer cellulose without gaps or cold spots
- Check the UK guidance before you start
- Separate rules for conversions and repairs
- Work out what deeper insulation actually saves
- Keep ventilation clear and the insulation dry
- Plan the job so the result lasts
- Quick questions
Part of our guide on how to insulate a suspended timber floor
Quick facts
- Total cellulose depth
- 270mm over 100mm joists
- Above joist level
- 170mm loose fill
- Free air gap
- 50mm minimum
- Ventilation channel
- Keep eaves open
- Typical density
- Check the bag label
- U-value target
- 0.15-0.16 W/m²K
Quick recap
- Aim for 270mm total depth over 100mm joists, matching current UK loft guidance.
- Keep the declared cellulose density intact; compression cuts both depth and performance.
- Leave 50mm free air space above the insulation for roof ventilation.
- Never block eaves ventilation or push insulation past the eaves.
- Check the U-value after installation and keep the material dry.
Set the total depth at 270mm for 100mm loft joists
Check the joist depth before you order. Most UK loft joists measure 100mm, but older properties sometimes use 75mm or 125mm timber. Measure across the top face of three joists in different places and take the smallest reading. Your total insulation depth depends on that number.
For 100mm joists, current UK guidance points to about 270mm of insulation in the loft space. That total includes the 100mm already occupied by the joists. You add roughly 170mm of loose-fill cellulose between and over the joists.
The figure assumes a pitched roof with the insulation laid at the density printed on the bag. Cellulose settles a little over time, so a fatter layer at installation can be sensible. Follow the manufacturer's stated settling allowance rather than guessing.
Mind the rule of thumb: fill the depth you can see, not the depth you hoped for. Measure with a marked depth gauge after each bay. A 50mm shortfall across a whole loft adds up to a measurable heat loss. We cover zone 6 attic insulation options in its own article.
- 100mm joists: 270mm total cellulose depth
- 75mm joists: check the guidance table for your roof type
- 125mm joists: measure again, then recalculate
- Loose-fill only: never roll or walk on the material
| Joist depth | Target total depth | Depth above joist |
|---|---|---|
| 75mm | Around 245mm | Around 170mm |
| 100mm | Around 270mm | Around 170mm |
| 125mm | Around 295mm | Around 170mm |
- 270mm suits current pitched-roof guidance
- Loose fill fills irregular joist gaps
- Settles into awkward roof shapes
- Needs a clear, dry loft
- Denser than quilted alternatives
- Depth takes up roof space
Why the target keeps changing
Building standards have moved on since most loft insulation went in. Older advice often assumed 100mm or 150mm, which suited the standards of the day and the fuel prices that came with them. Current targets assume cheaper heating and warmer homes, so the thickness requirement rises.
Read the U-value rather than the age of the advice. A loft with 100mm of old quilt insulation plus 170mm of cellulose may not match a loft built entirely to the current target. Adding depth to an old layer is often easier than lifting it, but you need the space.

Aimee’s Workshop Attic Anchor
Staple these 24-inch (610mm) rulers beside your joists so you can check the blown cellulose has reached 270mm over your 100mm joists instead of eyeballing it.
Layer cellulose without gaps or cold spots
Work in one direction across the loft and keep a consistent fill depth from eaves to ridge. The classic mistake is pouring a generous layer over the first bay, then rushing the rest. That leaves thin patches above the joists, which become cold bridges and visible damp streaks later. We go through listed building consent for loft insulation step by step elsewhere on the site.
Lay cellulose lightly, then break it up with a rake or the laying board supplied with the machine. Packing it down squeezes out air and reduces the declared performance. Cellulose works partly by trapping still air between fibres, so a compressed blanket is not the same product as a loose fill.
Fill between the joists first, then bridge across them. Keep the depth gauge moving with you and check every few metres. Where pipes, cables or light fittings intrude, split the material around them and use cardboard to create a barrier so nothing is pushed into a gap.
- Clear debris and check the loft for leaks, pests and exposed cables.
- Mark the target depth on a depth gauge and set the blowing machine to the bag's density figure.
- Fill each bay between joists evenly, keeping the hose moving across the width.
- Build up the layer over the joists without walking on the finished fill.
- Check depth at the eaves, mid-bay and ridge, then correct thin spots.
- Fit the eave baffles before closing the hatch or finishing the ventilation channels.
- Fills irregular spaces without cutting
- Bridges joists and reduces cold bridging
- Loose fill suits awkward roof shapes
- Sensitive to installation density
- Requires a dry, accessible loft
- Needs careful depth checks
Check the UK guidance before you start
Current UK guidance and building regulations set the target by U-value, not by a single universal thickness. For a pitched roof loft, the commonly cited target for new insulation sits around 0.15 to 0.16 W/m²K. Older lofts may be allowed to stay below that under some circumstances, which is where the confusion starts. There is more on uk loft insulation thickness 270mm in a separate guide.
Approved Document L sets the energy-efficiency requirement for new work and conversions. Approved Document F covers ventilation, and Approved Document C covers damp control. Those two matter as much as the insulation in a cold loft because trapped moisture can rot timber and defeat the savings.
Check the Building Regulations for your project type. If you are only adding insulation to an existing loft and not converting it, the rules differ from a new build. A loft conversion usually triggers its own set of insulation and ventilation requirements, and a Building Control officer can confirm the route before work starts.
Treat the 270mm figure as the practical answer for 100mm joists on a typical pitched roof, then verify the whole assembly. Thermal performance depends on the insulation, the joists, plasterboard and any waterproof layer working together. If that sounds like your situation, read up on cellulose loose fill settling rate after installation next.
- Approved Document L: energy efficiency and U-values
- Approved Document F: ventilation provision
- Approved Document C: moisture control
- Building Control: check before conversion work
| Document | What it covers | Why it matters here |
|---|---|---|
| Approved Document L | Energy efficiency | Sets the target U-value |
| Approved Document F | Ventilation | Sets air path and eave rules |
| Approved Document C | Moisture control | Limits condensation risk |
| Building Control guidance | Route of approval | Confirms what applies to your loft |
- Sets a measurable target
- Links insulation to ventilation
- Covers new work and conversions
- Targets differ by roof and project
- Older lofts may qualify for exceptions
- Ventilation rules need separate design
Separate rules for conversions and repairs
A conversion changes a space into a habitable room, and the rules follow. If you are only topping up an unconverted loft, the target may be less demanding. Confirm which case applies to you in writing before the installer starts, because the thickness changes with it.
Work out what deeper insulation actually saves
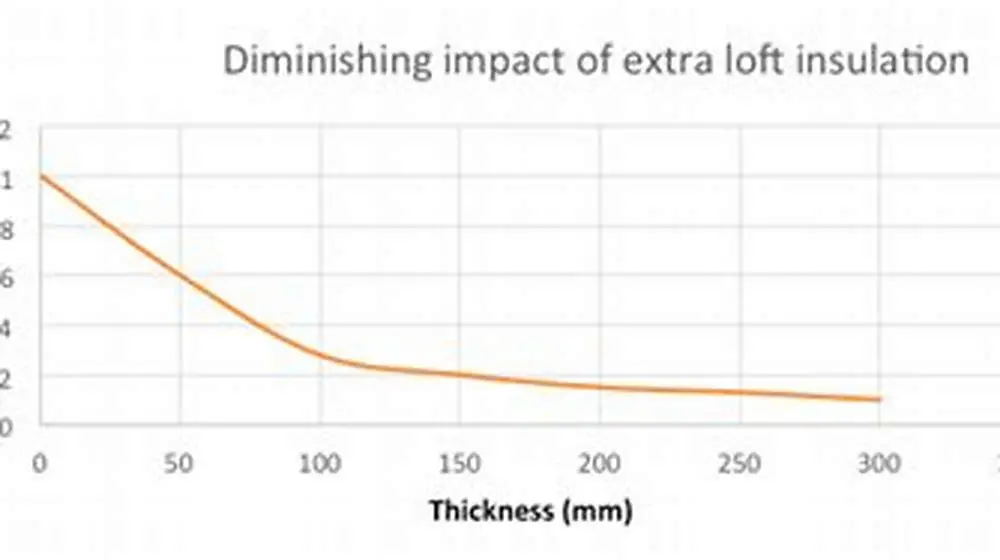
Depth drives the U-value, and the U-value drives the heat loss. The relationship is not linear, so a modest extra layer gives a smaller saving than the first layer did. Doubling thickness roughly halves the insulation's contribution to heat loss, but the joists and ceiling finish limit the total.
The 100mm joists themselves remain a thermal bridge. Cellulose laid over and between them reduces the bridge effect compared with a thin quilt between joists only, but it cannot remove it. For the biggest improvement, fill the bays fully and carry the layer across the tops of the joists. We cover staple gun jams on insulation netting in its own article.
The bill saving depends on heat loss, gas or electricity price, and how much you heat the space. A well-insulated, airtight loft with good ventilation typically cuts winter heat loss through the roof noticeably. The eaves and the uninsulated ceiling void are the usual weak points people notice first as fewer drafts.
Check your EPC after the work if you plan to sell, rent or claim a grant. The Energy Performance Certificate records insulation and other energy features, and a better rating can support a warmer, more efficient home. It will not change from insulation alone if your heating and glazing remain poor.
- Cuts roof heat loss
- Reduces drafts and condensation risk
- Supports a better EPC
- Savings depend on system efficiency
- Thickness needs clear space
- Air sealing still matters
Keep ventilation clear and the insulation dry
Leave a 50mm clear air channel between the top of the insulation and the roof covering. That gap lets cold air from the eaves move out through the ridge. The mistake people make is packing cellulose into the eaves, which blocks the path and traps moisture against the roof.
Fit eave baffles or wind barriers where insulation reaches the eaves. They hold the material back and keep air moving above it. Check the baffle's fixing points, since a loose barrier can flap and collapse into the ventilation path.
Think about moisture before you think about savings. Warm air carrying water vapour rises into the loft, and it needs somewhere to go. Insulation slows the rate at which the roof assembly warms up, so ventilation has to do more work. A blocked eave and a cold bridge combine into the classic mould and rot pattern.
Keep the cellulose dry during installation and after. Wet cellulose loses performance, and the timber around it can deteriorate. Do not install during or immediately before rain unless the loft is well protected, and check for leaks before the blower starts.
- Clear channel: at least 50mm above the insulation
- Eave baffles: fitted where insulation meets the eaves
- Ridge vent: open and unobstructed
- Leaks: repair before installation
- Cold bridging: fill between and over joists
| Check | What good looks like | Why it matters |
|---|---|---|
| Eaves path | Open and visible | Lets cold air escape |
| 50mm channel | Clear across the loft | Keeps air moving above fill |
| Ridge vent | Unblocked | Allows air to leave |
| Cellulose | Dry and loose | Retains performance |
| Joist bays | Evenly filled | Reduces cold bridging |
- Keeps the air path open
- Reduces condensation risk
- Protects timber from damp
- Extra parts and fitting time
- Baffles can work loose
- Requires a clear inspection route

Durovent with Baffle Attic Vent Channel
Staple these vent channels to the eaves so the 270mm of cellulose cannot slump over the air path and block loft ventilation.
Plan the job so the result lasts
Get the depth gauge right first. A marked stick or a purpose-made loft depth gauge lets you check the fill without kneeling in the material. Set the target on it before the first bag is opened, and check again at the end of every bay.
Decide who does the work. Professional blown installation suits larger lofts, tight access and any project needing a ventilation design. It also gives you a written record of the insulation type, depth and density, which can help with an EPC or a grant application later.
Check your grant routes before you spend. The Boiler Upgrade Scheme supports heat pumps, not insulation. The ECO4 scheme and the Warm Homes Plan operate through approved installers and can fund insulation measures in eligible homes. Eligibility depends on the property, the household and the scheme rules at the time of application.
Do the small jobs alongside the big one. Seal obvious gaps around pipes, light fittings and the loft hatch, add a well-insulated hatch, and fit a thermometer or temperature logger so you can see how the loft behaves through a cold spell. Those measures cost little and make the insulation work harder.
- Confirm the target U-value and ventilation design.
- Check whether insulation qualifies you for ECO4 or Warm Homes Plan support.
- Choose professional installation for a large or awkward loft.
- Set up a depth gauge and mark the target.
- Record the product, density and finished depth after installation.
- Add a thermometer and monitor after the first cold spell.
- A measured record supports EPC and grant claims
- Professional install reduces gaps
- Monitoring catches problems early
- Loft access and prep add cost
- Grant schemes change
- Small jobs add up quickly
For 100mm loft joists, specify 270mm total cellulose depth with 170mm above the joists, a 50mm clear ventilation channel, and open eaves.
Quick questions
Can I just lay cellulose over existing quilt insulation?
Yes, in many lofts, provided the existing layer is dry, undamaged and not compressed. The 270mm total target then means adding enough cellulose on top to reach that depth. Lift and check the old insulation first, because a wet layer is worthless and can damage the timber.
How much cellulose do I need for a 10m² loft?
Work from volume, not weight. Multiply the area by the target depth, then use the density on the bag to convert to bags. A professional installer can calculate this quickly and set the blowing machine accordingly.
Does cellulose settle over time?
Loose-fill cellulose compacts slightly, and the density figure on the bag is set to account for that. Install to the stated depth at the stated density, follow the maker's settling allowance, and check again after the first winter if you want reassurance.
Will thicker insulation make my loft damp?
Not by itself, but poor ventilation plus moisture will. Keep the 50mm channel clear, leave the eaves and ridge open, and install only into a dry loft. Warm, humid air needs an exit route, especially over cold timber.
Do I need a professional installer?
For a large loft, awkward access or a ventilation design, yes. A professional sets the density, controls depth and documents the install. For a small DIY bay, a rental blower and a depth gauge can work, but mistakes are hard to undo once the material is down.