Find out if 50mm PIR board is enough for room-in-roof insulation and when thicker boards are required to meet UK regulations and reduce energy bills.
A 50mm PIR board usually does not meet UK Building Regulations for room-in-roof insulation by itself because it typically offers a U-value around 0.3 W/m²K, above the required 0.18 W/m²K target. Thicker or additional insulation is often needed.
On this page
- The short version
- UK minimum thickness for room-in-roof PIR insulation
- Energy performance impact of 50mm vs 75mm+ PIR boards
- How to check if existing 50mm PIR insulation is adequate
- When upgrading to thicker PIR boards is justified
- Is 50mm PIR board enough for room in roof insulation?
- Common condensation and cold bridge checks for PIR-insulated roofs
- Questions people still ask
Part of our guide on improving home comfort
This page clarifies when 50mm PIR board is enough or needs upgrading to meet UK room-in-roof insulation rules.
| Typical 50mm PIR U-value | 0.3 W/m²K |
|---|---|
| Building regs max U-value | 0.18 W/m²K |
| Recommended PIR thickness | 75-100 mm |
| Condensation check tool | Hygrometer |
| Thermal gauge needed | To test existing insulation |
The short version
- 50mm PIR gives about 0.3 W/m²K under ideal conditions.
- Building regs for roofs target max U-value of 0.18 W/m²K.
- Condensation risk rises if insulation is insufficient or poorly ventilated.
- Check existing boards with a thermal gauge to assess adequacy.
- Upgrading to 75mm+ PIR is justified for substantial energy savings.
UK minimum thickness for room-in-roof PIR insulation
The UK Building Regulations (Part L) require insulation in roof spaces to achieve a maximum U-value of 0.18 W/m²K. A single layer of 50mm PIR board typically achieves a U-value around 0.28 to 0.32 W/m²K depending on installation quality and surrounding materials.
This value is above the regulatory limit, meaning 50mm by itself falls short for the main thermal layer in a room-in-roof scenario. The minimum thickness usually referenced is 75mm of PIR or equivalent, especially if you want to meet or exceed the target U-value.
Sometimes, 50mm PIR can be used as part of a multi-layer insulated system, combined with other insulation types or with an additional 50mm layer, to meet building standards.
In roof spaces where the PIR layer is exposed between rafters, achieving the 0.18 W/m²K target with only 50mm PIR is unlikely without other measures. Before you commit to anything, it is worth looking at how to apply spray foam insulation.
In some cases, the actual thermal conductivity (lambda value) of PIR boards varies between 0.022 and 0.026 W/mK. A 50mm PIR board with a lambda of 0.022 gives a U-value close to 0.25 W/m²K rather than 0.3. This means better quality PIR slightly improves performance but still falls short of the 0.18 target.
If the PIR board is installed over an existing layer of insulation, such as mineral wool or rigid foam board, the combined thickness may meet regulations. For example, 50mm PIR over 100mm mineral wool can reduce the overall U-value to around 0.17 W/m²K, complying with Part L requirements. However, the layers must be continuous without gaps to avoid heat loss.
| PIR Thickness (mm) | Typical U-value (W/m²K) |
|---|---|
| 50 | 0.28 to 0.32 |
| 75 | 0.18 to 0.22 |
| 100 | 0.14 to 0.18 |
Energy performance impact of 50mm vs 75mm+ PIR boards
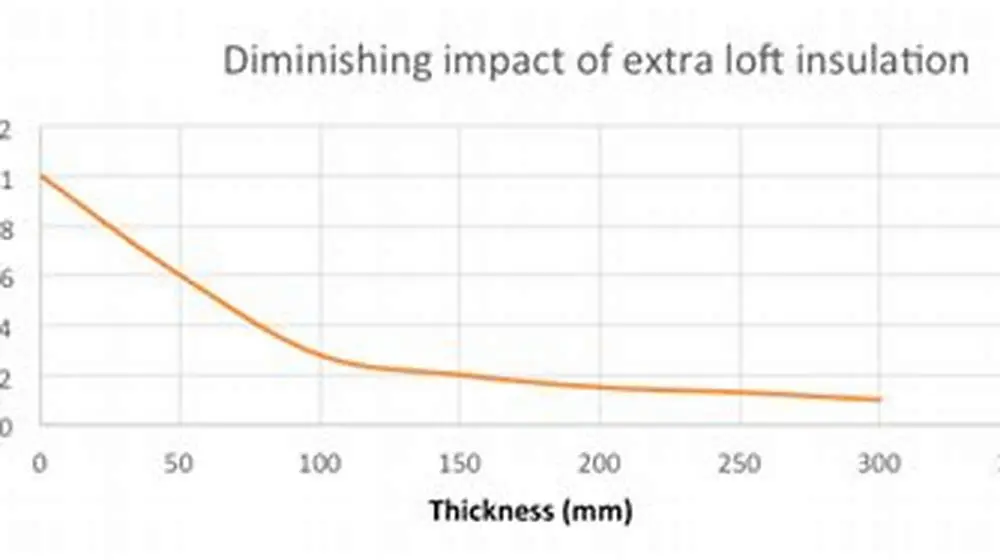
Upgrading from 50mm to 75mm or thicker PIR boards reduces heat loss significantly. The difference in U-value translates to measurable energy savings and warmer rooms, especially in colder months. If that sounds like your situation, read up on improving insulation performance next.
A 50mm board loses about 2 to 3 times more heat compared to a 100mm thickness. This means higher heating bills and increased drafts if insulation is insufficient.
Thicker PIR insulation improves the overall EPC rating of your home, potentially qualifying you for better grants or schemes like ECO4 or the Boiler Upgrade Scheme when combined with other efficiency measures.
The trade-off is cost and space. Thicker boards demand more roof depth clearance and a higher upfront investment. However, the long-term payback through energy savings often justifies this expense. If that sounds like your situation, read up on internal vs external wall insulation for solid walls next.
The energy saved by upgrading insulation depends on the home's size and heating system efficiency. For a typical 100 m² room-in-roof, increasing PIR thickness from 50mm to 100mm can reduce heat loss by about 60%. This could save around £150 annually on heating in a cold UK climate.
Some homeowners underestimate how much thickness affects heat retention. Doubling the PIR thickness from 50mm to 100mm halves the U-value from roughly 0.3 to 0.15 W/m²K. This difference shows up as noticeably warmer rooms and less condensation risk during winter.
When planning insulation upgrades, check if your roof construction allows thicker boards without compromising ventilation or headroom. If not, consider combining thinner PIR with other insulation materials or adding internal insulated plasterboard to improve performance. We go through recommended loft insulation thickness uk 270mm step by step elsewhere on the site.
| Measure | 50mm PIR | 75mm PIR | 100mm PIR |
|---|---|---|---|
| Approximate U-value (W/m²K) | 0.3 | 0.18 | 0.14 |
| Estimated heat loss | High | Moderate | Low |
| Impact on EPC | Modest | Significant | Best |
| Space required (mm) | 50 | 75 | 100 |
| Typical cost | Low | Medium | High |

Raythink EX10 Pro 2.8" Dual-Lens Thermal Camera
Detects temperature differences as small as 0.04°C, enabling precise identification of heat loss areas in your roof insulated with 50mm PIR board.
How to check if existing 50mm PIR insulation is adequate
Measuring the existing insulation’s effectiveness requires a thermal imaging camera or a thermal gauge to detect heat loss through the roof.
You can also measure the thickness and type of insulation physically if accessible. Compare its thickness to the target of 75mm+ PIR and check installation gaps or compression.
Check for signs of condensation or damp patches in the roof space, as thin insulation increases surface cold spots and condensation risk. We cover installation tips for slab edge insulation in its own article.
Using a hygrometer to measure humidity alongside surface temperatures helps identify areas where moisture may accumulate behind or above the insulation.
If you find areas colder than 12°C when outdoor temperature is below 0°C, the insulation is likely insufficient to prevent condensation risks and heat loss.
Perform a spot check by placing your hand near the inside surface of the roof on a cold day. If the surface feels noticeably cold or damp, the insulation is likely inadequate.
Measure the thickness of the PIR boards in several places. If some boards are compressed below 50mm or have gaps at edges, the effective insulation is less than rated, increasing heat loss.
If you detect cold spots or condensation, consider adding insulation or improving ventilation. Thermal imaging after sunset highlights cold areas clearly, confirming insufficient insulation or hidden gaps.
In a typical UK winter, surface temperatures of well-insulated roof layers stay above 12°C. Surfaces colder than this suggest heat loss severe enough to cause condensation problems and discomfort.
- Inspect insulation thickness and type visually or with a probe.
- Use a thermal imaging camera to detect heat loss patterns.
- Measure humidity and temperature in roof spaces with a hygrometer.
- Look for condensation stains, damp patches, or mould growth.
- Compare measured U-values or heat loss to building regulations.
When upgrading to thicker PIR boards is justified
Upgrading from 50mm PIR to 75mm or thicker is justified if your home’s EPC rating is poor, or your heating bills are uncomfortably high, even after other measures.
If your current insulation fails the U-value requirement or causes condensation and cold bridging, thicker boards will reduce heat loss and improve indoor comfort.
Homes with room-in-roof conversions often have limited space; assess if thicker insulation fits without compromising head height or ventilation.
Financial help through schemes like ECO4 or Warm Homes Plan may make upgrading affordable, especially for low-income households or rented properties needing energy efficiency improvements.
If you plan to install a vapor control layer or improve ventilation, combining these with thicker PIR is cost-effective and prevents damp.
In older buildings where insulation was minimal or absent, upgrading from 50mm PIR to thicker insulation can dramatically reduce heating costs and improve comfort.
If you experience frequent condensation, peeling wallpaper, or musty smells in upper rooms, poor insulation might be a cause. Thicker PIR boards combined with vapor control can help eliminate these issues.
If your roof has complex shapes or dormers, adding thickness uniformly may be difficult. In such cases, install thinner PIR in tight spots and compensate with thicker layers elsewhere or use spray foam insulation to fill gaps.
When upgrading, remember that thicker insulation slows warming and cooling cycles inside the roof space. This can prevent thermal stress and prolong roof structure lifespan.
- Energy savings justify costs when heat loss is high.
- Condensation risk drops with sufficient insulation thickness.
- Spatial constraints may require alternative insulation arrangements.
- Grant schemes improve affordability for upgrades.
Is 50mm PIR board enough for room in roof insulation?
A 50mm PIR board alone is generally not enough to meet UK Building Regulations in room-in-roof insulation because it usually cannot achieve the required U-value of 0.18 W/m²K.
You can sometimes meet or approach the standards by combining 50mm PIR with other insulation types or additional layers, such as insulated plasterboard or mineral wool above or below.
Risk of condensation and cold bridging is higher with 50mm PIR if ventilation is poor or installation gaps exist. Always check roof ventilation and vapor control layers when using thinner insulation.
To decide if your 50mm PIR layer suffices, measure actual heat loss with a thermal gauge and assess condensation risks using a hygrometer for humidity and temperature monitoring in the roof space.
In nearly all typical UK room-in-roof situations, upgrading to at least 75mm PIR is the safer, more energy-efficient choice.
In some cases, building designers specify 50mm PIR as part of a multi-layer system where additional insulation is installed under plasterboard or in ceiling cavities, making the total insulation adequate.
If your 50mm PIR board is fitted directly between rafters with no continuous layer beneath, heat loss and cold bridging increase significantly, confirming that 50mm alone is insufficient.
A quick calculation: 50mm PIR at lambda 0.022 W/mK gives a resistance of 0.05 / 0.022 = 2.27 m²K/W. The U-value equals 1 divided by resistance, so U = 1 / 2.27 = 0.44 W/m²K. This simple figure shows 50mm PIR alone cannot meet 0.18 W/m²K requirements without other layers.
Always check for thermal bridging around skylights, chimneys, or wall junctions when using thin insulation. These spots reduce overall effectiveness.
Common condensation and cold bridge checks for PIR-insulated roofs
Cold bridging occurs when insulation gaps or structural members conduct heat outwards, creating cold spots prone to condensation. It is common where 50mm PIR leaves gaps or covers rafters unevenly.
Ensure PIR boards fit tightly without compression or gaps. Use a vapor control layer to stop warm indoor air reaching cold surfaces inside the roof space.
Ventilate roof spaces with breathable membranes or vents to keep humidity low and prevent moisture buildup behind insulation.
Check for mould or damp patches regularly in roof voids. High relative humidity above 70% combined with surface temperatures below dew point causes condensation.
Use a hygrometer to monitor humidity and a thermal gauge to scan for cold bridges at joints or penetrations in the insulation. Fixing these spots is critical regardless of board thickness.
Cold bridges appear most often where PIR boards meet joists or rafters without airtight sealing. Even small gaps let warm air escape and cause moisture to condense on cold surfaces.
If you notice mould growth on timber beams near insulation edges, cold bridging is likely. Repair involves sealing gaps with expanding foam or tape and adding insulation layers to cover exposed timber.
A vapor control layer must be continuous and properly sealed at edges and joints. If it is punctured or missing, warm moist air migrates into cold roof spaces, causing condensation regardless of PIR thickness.
Check ventilation paths to ensure air flows freely above insulation. Blocked or missing vents increase humidity and condensation risk, especially with thin PIR boards.
Use portable hygrometers to record relative humidity over several days in winter. Values consistently above 75% indoors with cooler roof surfaces indicate insufficient vapor control or ventilation problems.
- Cold bridging - occurs at gaps or rafters without insulation.
- Vapor control - essential to prevent moisture migration.
- Ventilation - keeps humidity below 70%, reducing condensation.
- Regular inspection - detects early damp or mould issues.
50mm PIR alone rarely meets UK regs for room-in-roof; upgrading to 75mm+ is usually required for compliance and energy savings.
Questions people still ask
Can I add another layer of insulation over 50mm PIR to meet regs?
Yes, adding an extra insulation layer like mineral wool or a second PIR board can help meet the 0.18 W/m²K target. Ensure combined layers fit within roof depth and include vapor control.
What tools help me test if my current insulation works?
A thermal imaging camera or thermal gauge measures heat loss, while a hygrometer checks humidity levels for condensation risk. These tools help assess insulation performance accurately.
Will thicker insulation affect my roof space height?
Thicker boards require more depth and may reduce headroom. Measure your roof space carefully and consider alternative insulation methods if space is limited.
Are grants available to upgrade room-in-roof insulation?
UK schemes like ECO4 and the Warm Homes Plan can fund insulation improvements for eligible households, especially where energy savings and health benefits are significant.
How often should I inspect insulation for condensation?
Check roofing insulation and roof voids at least annually, especially after winter, to spot damp or mould early and prevent damage.