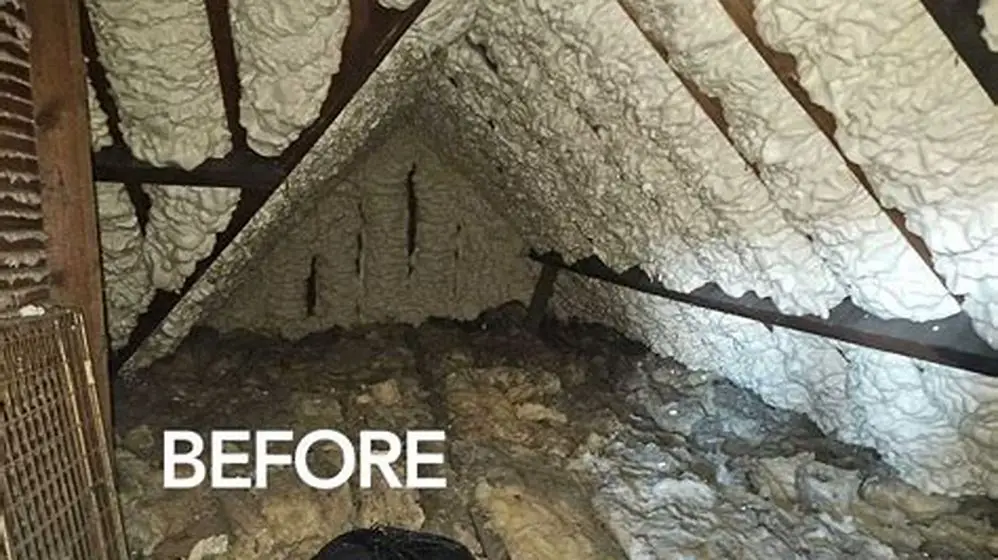
Identify if spray foam sagging in your loft after a year is due to moisture, settling, or poor application with clear signs and checks.
Spray foam insulation in a loft sags after a year mainly due to moisture damage, structural settling, or poor product application. Spotting the cause requires visual checks, a moisture meter, and sometimes infrared scanning or probing. Immediate risks include reduced thermal performance and water damage.
On this page
- The short version
- Typical reasons spray foam sags after a year
- How to identify moisture vs structural vs product issues
- What immediate steps to take once sagging is noticed
- How settling, moisture and poor application affect retrofit planning
- Signs spray foam sagging is due to moisture in a UK loft
- How to tell if sagging spray foam is due to structural settling
- Questions people still ask
Part of our guide on staged home retrofit
Identify exactly why your loft’s spray foam insulation is sagging after a year with clear signs and simple tests.
| Common causes | 3 main types |
|---|---|
| Sagging timeframe | Within 1 year |
| Moisture detection | Moisture meter |
| Thermal check | Infrared camera |
| Immediate risk | Heat loss & damp |
The short version
- Sagging usually means moisture, settling, or poor application
- Visual clues and moisture meters help identify the cause
- Infrared and probe checks confirm hidden damp or voids
- Address sagging fast to avoid energy loss and damp issues
- Plan retrofit stages to balance cost, disruption, and savings
Typical reasons spray foam sags after a year
Spray foam insulation can sag in a loft within a year due to several causes. The three most common are moisture intrusion, structural settling or movement, and poor application during installation.
Moisture issues arise when condensation or leaks saturate the foam. This causes the foam to lose rigidity and sag under its own weight. Moisture sources include roof leaks, poor loft ventilation, or plumbing faults.
Structural settling happens as timber joists or roof timbers shift slightly over time. This can pull or stress the foam, especially if it was applied unevenly or too thin in places.
Poor application means the foam was not mixed or sprayed correctly, causing weak bonding or uneven curing. Low-density foam may sag as it fails to support its own weight after curing. It helps to understand ensuring effective ventilation fit before going further.
Some foam sagging results from improper storage or handling before installation. If the foam chemicals degrade or the equipment malfunctions, the foam may cure poorly and lose strength over time. This problem can be hidden initially and only appear after a year as the foam sags or crumbles.
Sagging may also reflect environmental extremes in the loft. High summer temperatures combined with high humidity can accelerate foam degradation or soften the material. In UK lofts without proper temperature control, foam densities between 1.0 and 1.2 pounds per cubic foot often perform best. Lower densities are more prone to sagging under these conditions.
- Moisture: condensation, roof leaks, poor ventilation
- Settling: timber shrinkage or movement causes stress
- Application: low density or incomplete curing
How to identify moisture vs structural vs product issues
Distinguishing between moisture, settling, or application problems relies on three main checks. First, visual inspection looks for surface defects, staining, or areas of collapse. If that sounds like your situation, read up on reasons for cold retrofit insulation next.
Next, use a moisture meter on the foam and nearby timber. Readings over about 18% moisture content in timber or damp foam indicate water problems.
Infrared cameras help spot cold spots or moisture trapped under foam. Cold areas often align with dampness or airflow leaks.
Probing gently with a blunt tool can test foam firmness. Soft, spongey sections suggest poor curing or moisture damage, while firm foam indicates structural issues. We cover retrofit hot water recirculation system in its own article.
Combining these methods helps pinpoint the cause. Moisture problems show damp stains and elevated readings. Settling causes cracking but dry foam. Product issues typically reveal uneven texture or softness overall.
A more detailed probe test involves pressing different parts of foam with a spring scale to quantify firmness. Values below 10 psi indicate weak foam prone to sagging. Comparing firmness across the loft helps differentiate poor application spots from moisture damage, which softens foam uniformly.
Sometimes moisture meters give borderline readings near 18%. In such cases, repeated measurements over weeks reveal if moisture is rising or stable. Rising moisture confirms leaks or condensation, while stable readings suggest settling or product problems. We cover building features for zero carbon in its own article.
Checking attic ventilation also aids diagnosis. Installing a temporary humidity sensor in the loft can track relative humidity changes. High readings over 70% correlate strongly with moisture-related sagging. This simple monitoring can save costly invasive inspections.
- Visual: stains, cracks, sag shape
- Moisture meter: >18% timber moisture signals damp
- Infrared camera: cold spots suggest moisture or air leaks
- Probe test: softness means damage or bad cure

General Tools MMD4E Moisture Meter for Wood
Detects moisture in wood and insulation with a broad range of 5-50% for wood and 1.5-33% for building materials, helping identify moisture causing spray foam sagging.
What immediate steps to take once sagging is noticed
If you spot sagging spray foam in your loft, swift action limits damage and heat loss. Start with a thorough visual check for leaks, damp patches or structural movement.
Use a moisture meter immediately to check for water presence in timber or foam. If moisture is high, fix the leak or ventilation issue at once.
If settling or poor application seems the cause, avoid walking on the foam or adding weight, which may worsen sagging or damage the roof structure.
Arrange a qualified surveyor or installer to assess the problem fully. Repairs may include removing damaged foam and replacing with correct density material.
In any case, improve loft ventilation and monitor regularly. Leaving sagging untreated risks worsening insulation performance and mould growth.
Document sagging patterns with photos and notes on locations, foam condition, and timber movement signs. This record helps professionals plan repairs and verify causes when they visit.
If leaks or dampness are found, stop heating the house to reduce loft moisture until repairs complete. Heating can raise condensation risk.
If sagging results from poor application, consider removing only weak, soft foam sections and reapplying new foam with proper mix ratios and thickness. Complete removal may not always be necessary.
- Inspect loft visually for stains, splits, or damp
- Measure moisture in foam and timber with meter
- Avoid disturbing sagging foam to prevent collapse
- Contact a professional for detailed survey and repair
- Improve loft ventilation to prevent further moisture
How settling, moisture and poor application affect retrofit planning
Understanding the cause of spray foam sagging guides retrofit plans. Moisture problems mean you must address leaks and ventilation before replacing insulation.
Settling suggests structural movement; retrofit stages should include timber repairs or reinforcement before foam installation.
Poor application issues call for training installers or specifying correct foam density and thickness to meet UK standards, such as BS 5422.
Balanced retrofit plans phase works to minimise cost and disruption. For example, first fix damp or structure, then install insulation, then improve ventilation and air sealing.
This staged approach prevents repeated work and saves on energy bills, while qualifying homeowners for grants like ECO4 or the Boiler Upgrade Scheme.
When planning retrofit, note that some timber movement continues for years after installation, especially in older buildings. Design foam thickness and density to tolerate this long-term settling without sagging.
If moisture caused sagging, retrofit plans should include upgrading vapour barriers and air sealing at loft hatch and joists. This prevents new moisture ingress and protects new foam.
You may need to re-evaluate overall loft insulation strategy. Combining spray foam with mineral wool or rigid board insulation layers can improve durability and reduce moisture risks in retrofit projects.
| Sag Cause | Retrofit Stage 1 | Retrofit Stage 2 | Retrofit Stage 3 |
|---|---|---|---|
| Moisture | Fix leaks & improve ventilation | Remove damaged foam | Install new foam insulation |
| Settling | Check & reinforce timber | Remove or support foam | Apply insulation with correct specs |
| Poor Application | Remove faulty foam | Train installers/spec foam | Reinstall foam at proper density |
Signs spray foam sagging is due to moisture in a UK loft
Moisture-related sagging usually shows visible wet patches or dark stains on the foam surface. These may appear around roof junctions, pipe penetrations, or near cold spots.
Condensation droplets on the loft timber or excessive dampness in the loft air suggest ventilation issues. This moisture penetrates foam and timber causing loss of rigidity.
A moisture meter reading above 18% in timber or the foam itself signals dampness. Infrared scans reveal cold, damp areas as dark patches contrasting warmer dry foam.
Smell can also give clues. Musty or mouldy odours point to moisture and microbial growth inside the foam or loft wood.
These signs help you separate moisture problems from settling or application faults, which usually lack damp stains or smells.
In some cases, moisture damage causes foam discoloration beyond stains. Foam may show grey or dark patches internally visible if the surface cracks open. This discoloration signals fungal or microbial growth, which accelerates foam breakdown.
If you detect moisture but no visible leaks, condensation may result from inadequate loft ventilation or blocked eaves vents. Clearing vents and adding mechanical ventilation can halt further sagging.
Check for plumbing pipes running through the loft for leaks or sweating. Persistent pipe condensation causes localized foam sagging. Wrapping pipes or insulating them separately may help reduce moisture exposure to foam.
- Wet or dark staining on foam surfaces
- High moisture meter readings >18% in timber
- Infrared cold spots matching sag areas
- Musty odours inside loft space
How to tell if sagging spray foam is due to structural settling
Sagging caused by structural settling shows cracks or gaps between foam and timber as the wooden joists shrink or move.
The foam remains dry on moisture meters, and infrared scans show no cold damp spots. Instead, sagging aligns with timber movement patterns.
Physical probing reveals firm foam that bends or detaches from supporting wood, not soft or spongey material.
Look for timber shrinkage signs like nail pop-outs, slight joist movement, or spaces at loft board edges.
Settling is more common in older homes with unseasoned timber or those with varying seasonal humidity but no leaks.
Structural settling often starts as minor sagging close to timber joints or joist ends. These areas experience the most shrinkage or movement. The foam may crack or split but remains adhered to joists.
Seasonal humidity changes cause timber to expand and contract yearly. Foam applied too rigidly without room for timber movement may crack or debond, causing sag spots.
If sagging is due to settling, remedial timber treatment or reinforcement with steel straps or sister joists may be necessary to stabilize structure and prevent further foam damage.
- Foam dryness on moisture meter (<18%)
- Cracks or gaps at foam-joist interface
- Firm foam on probe test
- Visible timber movement or shrinkage
Questions people still ask
Can spray foam insulation be repaired if it sags?
Minor sagging from settling can sometimes be supported or trimmed and resealed. If sagging is caused by moisture or poor application, damaged foam needs full removal and replacement.
Will sagging spray foam reduce my EPC rating?
Yes. Sagging lowers insulation effectiveness, raising heat loss and worsening energy performance. Fixing sagging can restore or improve your EPC score.
How do I find a qualified installer for spray foam in the UK?
Look for installers certified under the British Urethane Foam Contractors Association (BUFCA) or equivalent UK schemes. Check past work and guarantee terms carefully.
Does loft ventilation help prevent spray foam sagging?
Proper ventilation controls moisture, reducing condensation that damages foam. It won't stop sag from settling or poor application but prevents most moisture-related sagging.
Which grants can help with fixing sagging spray foam insulation?
UK schemes like ECO4 or the Boiler Upgrade Scheme may fund repairs if you improve whole-house energy efficiency. Check eligibility carefully before work.