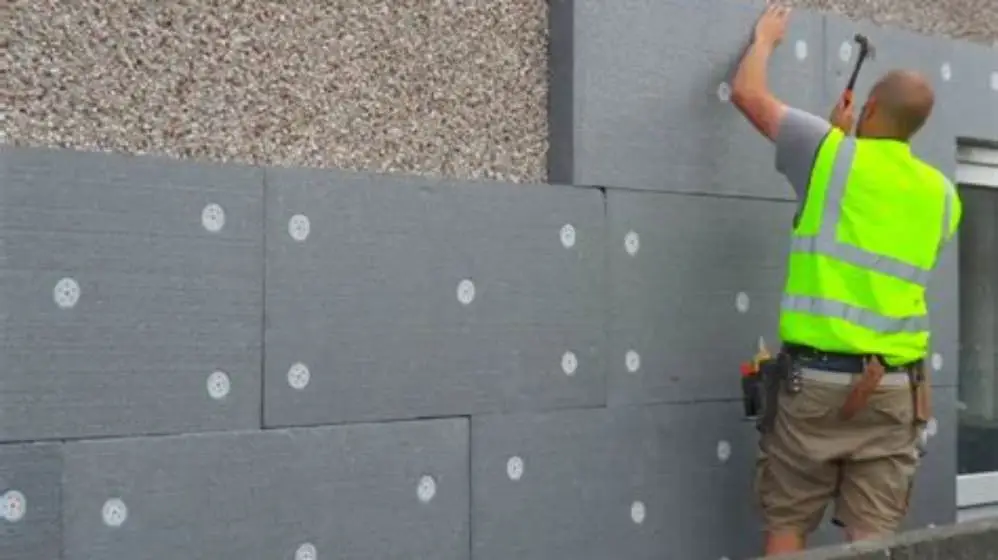
Use a soft-bristle brush and garden hose to wash external wall insulation, working from top to bottom with plain water or diluted mild detergent. Avoid pressure washers above 2 bar, stiff brushes, and solvent-based cleaners: all crack render, strip factory coatings, and let water behind the insulation where it causes damp and mould.
On this page
Part of our guide on improving home comfort
Quick facts
- Maximum pressure
- 2 bar or 30 psi
- Cleaning frequency
- every 2-5 years depending on location
- Safe detergent
- pH-neutral, 1:10 dilution
- Brush type
- soft natural or nylon bristle
- Drying time
- 24-48 hours before inspection
- Test patch duration
- 48 hours minimum
Quick recap
- Clean render with a soft brush and low-pressure water; pressure washers above 2 bar crack the finish and void warranties
- Work top to bottom in 1-metre sections so dirty runoff doesn't streak clean areas below
- Wash every 2-3 years in cities, every 4-5 years in rural areas; algae and moss hold moisture against the render
- Never use acid, bleach or solvent cleaners: they strip the water-repellent coating and leave the insulation exposed
- Test any cleaner on a hidden patch for 48 hours; some renders discolour or soften with the wrong product
Why external wall insulation needs different cleaning
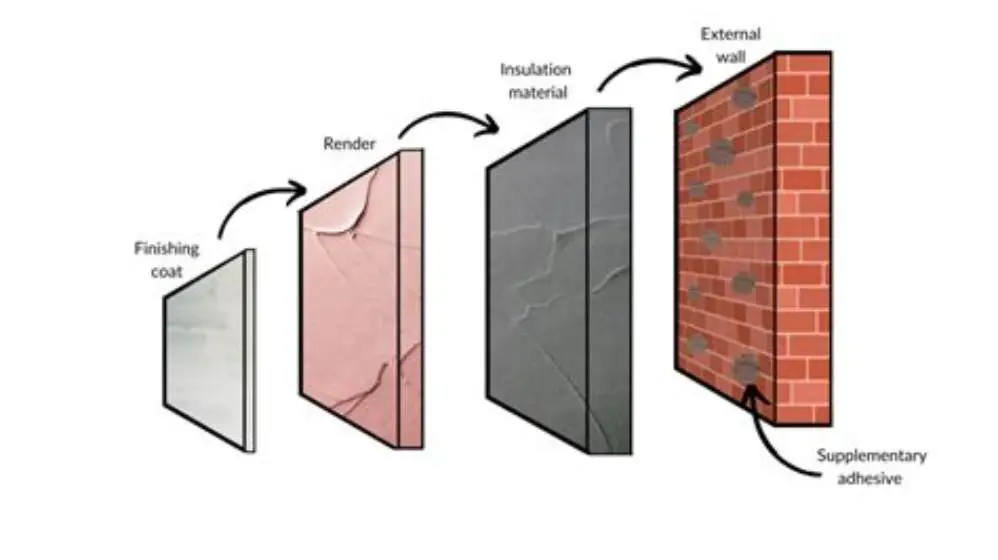
External wall insulation systems (EWI or EWIS) aren't solid walls. They're layered: insulation boards glued and pinned to your brick or block, then covered with a thin render coat usually 10 to 15 mm thick. That render is the only weather barrier. Crack it or strip its factory coating and water gets behind the boards, where it sits against your original wall and causes damp, mould, and in freezing weather, blown render as trapped moisture expands.
The thin render is softer than brick. Most systems use polymer-modified or silicone renders that stay flexible so the wall can breathe and move with temperature changes. Stiff wire brushes gouge them. Pressure washers above 2 bar force water into joints, around window reveals, and through hairline cracks you can't see. Once water is behind the insulation, it can't dry outward through the render's vapour control layer, so it dries inward into your home or stays trapped, feeding mould and rot.
The render also carries a factory-applied water-repellent coating, sometimes silicone, sometimes acrylic. Harsh cleaners strip it. Without that coating, algae and moss colonise the surface faster because the render stays damp longer after rain. You'll be cleaning every year instead of every few, and each clean does a bit more damage. Treat the render as a protective skin, not a surface you can scrub hard.
Most EWI warranties (typically 25 years for the system, 10 to 15 years for the render finish) explicitly exclude damage from improper cleaning. Installers usually specify low-pressure water and approved cleaners only. Check your warranty paperwork before you start; using a jet washer or the wrong chemical can void cover for render failure, and a full re-render costs £40 to £80 per square metre depending on the system and scaffold access. The other half of this decision is planning cellulose top-ups.
Tools that won't scratch or gouge the render
Use a soft-bristle brush with an extension pole. Natural bristle or soft nylon works; avoid anything marketed as stiff, hard, or for masonry. The pole should reach your first-floor render from the ground (2 to 4 metres) so you're not working from a ladder, which puts too much pressure on the brush and on you. A telescopic pole lets you adjust reach as you work across the wall.
Pair the brush with a standard garden hose fitted with a spray nozzle you can adjust from jet to a wide, gentle fan. You want the fan setting, which spreads water over a 30 to 40 cm width at low velocity. The flow rate from a typical mains hose is around 10 to 15 litres per minute at 2 to 3 bar, which is safe. A pressure washer, even on its lowest setting, usually delivers 100 bar or more: that's fifty times the force, and it will crack render, blow out joints, and drive water deep into the wall.
If you must use a pressure washer because the wall is very high or access is awkward, fit a low-pressure nozzle or rotary dirt brush attachment and stay below 30 psi (roughly 2 bar). Keep the nozzle at least 30 cm from the wall and never hold it in one spot. Even then, test a hidden patch first and watch for surface erosion, colour change, or water seeping from joints. Stop immediately if any appear. We go through internal vs external wall insulation for solid walls step by step elsewhere on the site.
You'll also need a bucket for diluted detergent, a sponge for spot-cleaning around windows and downpipes, and old towels or a plastic sheet to protect paving, planting, and any outdoor electrics below the wall. Render cleaning creates a lot of runoff, often with algae and dissolved dirt that stains concrete or kills plants if it pools.
- Soft-bristle brush: natural or nylon, never wire or stiff masonry bristle
- Extension pole: 2-4 metres telescopic, so you're not leaning from ladders
- Garden hose with adjustable spray: fan setting, not jet, for gentle rinsing
- Bucket and sponge: for mixing detergent and spot-cleaning detailed areas
- Protective sheet: to catch runoff and protect planting or paving below

20 Foot Exterior House Cleaning Brush Set with 4-12 ft Extension Pole
No information on bristle material or pole length to confirm suitability for gentle cleaning of external wall insulation.
How to clean external wall insulation step by step
Pick a dry, overcast day with no rain forecast for 24 hours. You want the render to dry fully after cleaning so you can inspect it for damage. Avoid bright sun, which dries detergent too fast and leaves streaks, and avoid windy days that blow spray onto windows and neighbours' walls.
Start at the top and work down in horizontal strips about 1 metre tall. Dirty water runs downward, so if you clean the bottom first, runoff from the top will streak it. Wet the section with your hose on the fan setting, then gently scrub with the soft brush using circular motions. Don't press hard: let the bristles do the work. You're lifting dirt, not scouring the surface. For the detail, see our notes on does your home have enough insulation.
Rinse each section thoroughly before moving lower. Any detergent left on the wall attracts dirt faster and can discolour the render as it dries. Work methodically across the wall, overlapping each strip slightly so you don't leave lines. For a typical semi-detached house with 60 to 80 square metres of EWI, expect the job to take 3 to 5 hours if the render is lightly soiled, longer if there's heavy algae or traffic grime.
Pay extra attention to areas below gutters, around downpipes, and near ground level, where splash-back from paving keeps the render damp and encourages algae. These spots often need a second pass with diluted detergent. Use a sponge to clean around window frames and other details the brush can't reach, and rinse those areas separately so detergent doesn't pool in the joints.
- Wet a 1-metre horizontal section at the top of the wall using the hose on a wide fan setting.
- Scrub gently with the soft brush in circular motions, letting the bristles lift dirt without pressing hard.
- Rinse the section thoroughly from top to bottom, making sure no detergent or dirty water remains.
- Move down to the next 1-metre strip and repeat, working your way to the bottom of the wall.
- Spot-clean window reveals, corners and downpipe brackets with a sponge and diluted detergent.
- Give the entire wall a final rinse from top to bottom, then let it dry for 24-48 hours before inspecting for damage.
When water alone won't shift the grime
Plain water removes most surface dirt, dust, and light algae. But traffic film (oily deposits from vehicle exhaust) and heavy biological growth need a detergent. Use a pH-neutral cleaner labelled safe for renders and external wall insulation, diluted to the manufacturer's rate, typically 1 part cleaner to 10 parts water. Stronger mixes don't clean better; they just increase the risk of stripping the water-repellent coating. For the detail, see our notes on installing insulation in tight spaces.
Apply the diluted cleaner with a sponge or a garden sprayer, let it sit for 5 to 10 minutes so it can break down the grime, then scrub gently and rinse thoroughly. Don't let it dry on the wall. Some renders, especially coloured or through-coloured systems, can show tide marks or discolouration if detergent is left to evaporate. If you're using a sprayer, keep the nozzle on a coarse mist, not a fine aerosol, so you're wetting the surface rather than saturating it.
Never use bleach, brick acid, or solvent-based cleaners. Bleach damages silicone and acrylic renders, often turning them chalky or changing their colour. Brick acid etches the surface and reacts with polymer binders in the render, weakening it. Solvents (white spirit, acetone, or anything that dissolves paint) strip the factory water-repellent coating and can soften the render itself. All three void warranties and cause problems that cost more to fix than the original dirt.
For stubborn organic stains (algae, lichen, moss) there are biocide treatments formulated for EWI. These kill the growth and prevent regrowth for 2 to 5 years depending on exposure. Apply them after cleaning, once the wall is dry. Follow the product instructions exactly; over-application wastes money and some biocides can harm planting or stain paving if runoff isn't controlled.
| Cleaning agent | Safe for EWI | Effect on render | Typical use |
|---|---|---|---|
| pH-neutral detergent (pH 6-8) | Yes | Lifts dirt without stripping coatings | General grime, light algae, traffic film |
| Biocide render cleaner | Yes, if labelled for EWI | Kills algae and moss, prevents regrowth | Heavy biological growth, shaded walls |
| Bleach or chlorine cleaner | No | Discolours render, damages polymer binders | Never use |
| Brick acid or masonry cleaner | No | Etches surface, reacts with render | Never use |
| Solvent (white spirit, acetone) | No | Strips water-repellent coating, softens render | Never use |

What damages render and how to spot it
Cracks are the most obvious damage. Hairline cracks under 0.5 mm are often superficial and cosmetic, especially on older systems. Wider cracks (1 mm or more) let water behind the insulation and need repair. Check around window and door openings, at movement joints, and anywhere two render colours or textures meet; these are the spots that crack first when cleaning is too aggressive.
Surface erosion shows as a rough or chalky texture where the render was smooth, or as exposed aggregate: the fine sand or particles in the render mix. If you can see the insulation board behind the render, stop immediately. That's through-damage and it needs professional repair before water gets in. Erosion usually happens when someone uses a pressure washer too close or holds it in one spot too long.
Discolouration (white patches, yellow streaks, or a general dulling) often means the water-repellent coating has been stripped. The render still protects the insulation, but it will stain faster and algae will colonise more quickly. Some discolouration settles after a few weeks as the render dries and weathers; if it doesn't, you'll need to reapply a silicone or acrylic sealer, which costs £15 to £25 per litre and covers 5 to 8 square metres per litre depending on the render texture.
Delamination or hollowness: tap the render lightly with your knuckles and listen for a hollow sound instead of a solid thud. Hollow patches mean the render has separated from the insulation board, usually because water got behind it and broke the bond. This is serious and needs a render specialist to cut out and replace the affected area. It's rare after a single cleaning, but repeated harsh cleaning or using solvents can cause it over time.
How often to clean and what speeds up soiling
Clean EWI every 2 to 3 years if you're in a city, near a busy road, or downwind of industrial areas. Traffic film and airborne particles settle faster in these locations. In rural areas with clean air, every 4 to 5 years is enough unless the wall faces north or is shaded by trees, which keeps it damp and encourages algae. South-facing walls in open sun often stay clean longer because UV light inhibits biological growth and rain washes off dust before it bonds to the surface.
Algae and moss grow fastest on damp walls. If your gutters overflow or downpipes splash onto the render, fix those first or you'll be cleaning constantly. The same applies to overhanging trees that drip onto the wall or block sunlight. Cut back branches and clear gutters every autumn so rainwater doesn't run down the render. A properly maintained gutter system and good drainage at ground level can halve your cleaning frequency.
Coloured renders, especially darker shades, show dirt and algae more obviously than white or light grey. They don't get dirtier; the contrast just makes it more visible. Some modern renders include a biocide additive in the factory mix that inhibits algae growth for 5 to 10 years, though effectiveness drops in very damp or shaded conditions. If your EWI is more than a decade old, that biocide has likely worn off, and you'll notice faster regrowth after each clean.
Check the render every spring for cracks, stains, and biological growth, even if you're not ready to clean. Catching a crack or a failed joint early costs far less to fix than finding it after water has been getting in all winter. Most installers recommend a professional inspection every 5 years, especially on multi-storey properties where scaffold access is needed for both cleaning and repair. That inspection typically costs £150 to £300 depending on property size and includes a written condition report.
- Urban or roadside: every 2-3 years due to traffic film and airborne pollution
- Rural or open locations: every 4-5 years unless the wall is shaded or damp
- North-facing or tree-shaded walls: every 2-3 years, as algae grows faster in shade
- After biocide treatment: next clean can often be pushed out by 1-2 years
Quick questions
Can I use a steam cleaner on external wall insulation?
Steam cleaners are generally safe if the steam nozzle is kept at least 30 cm from the render and moved constantly. The heat can help lift organic stains, but prolonged exposure softens some polymer renders. Test on a hidden area first and avoid high-pressure steam settings. A soft brush and pH-neutral detergent usually work just as well without the risk.
What should I do if the render has turned green with algae?
Clean the algae off with a soft brush, diluted pH-neutral detergent, and plenty of rinsing, then apply a biocide treatment labelled for EWI once the wall is dry. The biocide kills remaining spores and prevents regrowth for 2-5 years. If the algae returns quickly, check for damp sources (blocked gutters, overhanging trees, or poor drainage) and fix those or you'll be cleaning constantly.
Will cleaning external wall insulation improve my EPC rating?
No. EPC ratings reflect thermal performance, not appearance. Cleaning removes dirt but doesn't change the insulation's U-value or the building's heat loss. A damaged render that lets water in can reduce the insulation's effectiveness over time, so keeping it in good condition indirectly protects the performance the EPC rating assumes.
Can I paint over EWI render after cleaning it?
Only with paint formulated for EWI systems: typically breathable silicone or acrylic masonry paint. Standard masonry paint can trap moisture and cause the render to fail. Clean the render thoroughly, let it dry for at least 48 hours, then apply the paint according to the manufacturer's instructions. Some warranties exclude repainting, so check your paperwork first.
How do I clean render around windows without damaging the seals?
Use a damp sponge and diluted detergent rather than a brush, and avoid soaking the window reveals. Wipe gently and rinse with a damp cloth rather than a hose so water doesn't run behind the frame. Check the silicone seals around the windows for cracks or gaps while you're there: failed seals let water behind the insulation and need resealing with a low-modulus silicone sealant.
Is it safe to clean EWI in winter?
Avoid cleaning when temperatures are near or below freezing, as water trapped in cracks or joints will expand when it freezes and cause further damage. If you must clean in winter, choose a dry day above 5°C and make sure the wall dries fully within 24 hours. Spring and early autumn are the best times: the render dries faster and you can inspect for winter damage at the same time.